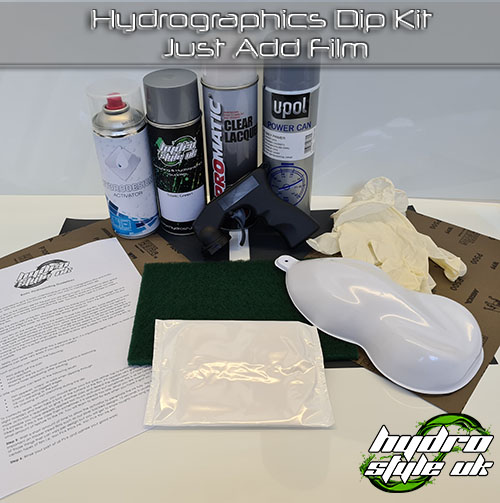
Unsure what you need to buy to begin your journey into hydrographics? Our hydrographics dip kit is the ideal purchase for you. Containing everything but the film, to allow you to choose as much or as little film as you require, you can get off to a great start.
The hydrographics dip kit contains a multitude of items that are essential in processing many items. Whether you are coating plastic, metal or anything else there will be a primer option suited to the job. Etch primer is used to give the first layer of adhesion for metals. Plastic primer as the name suggests is the option to go for when coating a plastic item.
So what steps would you perform with the kit?
STEP 1:
To begin with prepare the surface of your item for painting. This is generally the bulk of the work given that items such as car wheels, motorcycle swing arms etc can be quite corroded and oily and need to be taken right back in order to get them ready for painting. You would use the 500 grit sanding paper and scotch pad to do this.
STEP 2:
The next step is to prime the item. If coating metal then use etch primer first. If coating plastic then use plastic primer first. Once this has been done you then spray a coat or two of high build primer which can then be sanded back again to give a perfect surface on which to spray your colour in the next step. You sand the high build primer with the 1000 grit paper provided.
STEP 3:
This step is where you will apply your colour of choice. Colours should be chosen based on how they will complement your chosen pattern and we go to great lengths to make great colours available to you to give your item a real one of a kind look. We recommend using the tack rag at this point.
STEP 4:
This is where you add your hydrographic design. Using our state of the art hydrographics activator you can make sure you get an awesome finish to your pattern. We have a huge range of Patterns to choose from so feel free to take a look. If you find a pattern you would like that we dont have on our site simply let us know and we will get it for you if we are able. Your kit includes a guide that will tell you how to use your film. Be sure to wear the provided gloves! You can use the speedshape provided to test colour and film combinations.
STEP 5:
Now add your lacquer to your product in order to seal in the pattern and make your item nice and durable. Extra layers can be added should your customer request it or if you deem it necessary such as in the case of a motorcycle frame that may get a bit of stick. We recommend using the tack rag at this point.
STEP 6:
The final step is where you finish your item and carry out any final polishing, buffing or anything else that is required by your design. Not everyone does this step (we do!) so we don’t include items for this in the kit but they are available on the website.
What does your kit include?
Our hydrographics dip kit includes the following professional quality branded items. All you need to do is add some film to your order and away you go:
- 1x Hydro Design Aerosol Activator
- 1x High Build Primer Aerosol
- 1x Custom Paint Aerosol
- 1x Aerosol Plastic Primer or Metal Etch Primer
- 1x Aerosol Clear / Lacquer
- 1x Aerosol Gun Trigger
- 1x General Purpose Mirka Pad
- 2x 500 grit sandpaper
- 2x 1000 grit sandpaper
- 1x Starchem Tack Cloth
- 1x Beginners Guide
- 1x Hydrographics Speedshape
- 1x Pair of rubber gloves (where available due to COVID)
Basic Hydroprinting Guidelines
Required Products For This Guide
Link – Hydro Design Activator
Link – Hydrographics Film
Link – 3M Respirator
Link – Protective Suit
These instructions are intended to give you a basic understanding of using our hydrographics films and Hydro Design activator. With this advice you should be well on your way to mastering each dip.
Step 1: Cut your film to the correct size for the part you are going to print. It is important to allow space on all sides of the part to maximise your working area. This can help to avoid any bubbles you may accidentally trap and also reduce stretching from the side. You may apply tape to 2 sides to make it easier to lay the film.
Step 2: Identify the sticky side of the film. This can be done by licking your thumb and forefinger tips and gently squeezing one edge of the film. Whichever finger the film stuck to, this is the side without ink and should be placed facing the water. So the sticky side always goes down!
Step 3: Lay your film on the water and allow the water to soak fully into the film. Some people try to stick to rigid timings such as 60 seconds. This is not a realistic method to use because all films can behave differently. Especially those printed on thicker PVA, which require much longer soak times. Having a higher or lower tank water temperature can also change the soak time so we recommend learning to read your film to know when it is fully hydrated. To do this simply observe your film on the water. What you are looking for is the moment when all the creases and wrinkles in the film have completely dropped out and the film is as flat as possible. Be sure to blow any bubbles to the side of the film as early as possible.
Step 4: Apply your activator. Whether this is aerosol or gun, it is important again to learn to read your film. Problems can arise very easily if you are not careful:
Too much activator can lead to the following:
- Print sliding off the part
- Paint reactions
- Marking in the ink such as small white worms or blotching
- Round holes appearing after printing.
Too little activator can lead to the following issues:
- Film appears ‘crispy’ or solid when dipping through
- Small holes with jagged edges
- Ink not adhering to the part
- Ink cracking or not stretching during the dip
To correctly apply activator, you should spray your first pass (either top to bottom or left to right with a slight overlap) and then take a look at the surface of the film. If it appears very grainy and dry, then more activator is required, so give it another pass and repeat the observation. If it looks very glassy then it is possible you have already applied too much activator but sometimes this is ok for certain heavier inked films. If this is the case then sometimes it is already too late. What you are looking for is just a very small amount of texture to the ink. You will learn to spot by eye when you have it spot on.
Step 5: Wait a short amount of time to allow the activator to penetrate the ink fully. This is especially important on thicker inked films such as our silver backed designs. 10 seconds is usually fine. This is one of those things that can vary per design but you will get to know roughly how long to ‘dwell’ for for certain types of film i.e. thin PVA thick ink, thin PVA thin ink etc.
Step 6: Rinse your part of all PVA and admire your good work!

