
Candy paint jobs, unlike standard paints or metallic paints, require a mid-coat to be applied over a specific base coat on the item you wish to paint. With careful preparation, the whole process is relatively simple. Without that correct preparation, painting items with candy paints can be a bit of an intimidating and altogether frustrating experience that isn’t worth the aggravation. Whenever possible, candy paint jobs should be applied within the confines of a sealed-atmosphere paint booth to prevent dust and debris from getting into the candy coat or clear top coat that must be applied afterwards.
Prepare the Items Properly
Preparation of the items for applying candy coat paint doesn’t differ from preparation for applying regular paint. First use a grey scotch pad such as our Mirka Mirlon to lightly scour the surface to ensure proper paint adhesion to your primer. Next thoroughly clean the entire paint surface with a high quality panel wipe / degreaser such as UPOL Generation 20. It’s important to thoroughly clean the surface because any imperfections in the base coat will be magnified by the candy mid-coat. Once imperfections are in the mid-coat, they can’t be repaired without stripping the paint down to the base coat and starting over again so take care at this stage to save yourself headache further down the line.
Spraying the Base Coat
Spray your base coat onto the item. This will usually be a bright silver such as our cool silver which is available in either aerosol or liquid form. To ensure correct results, use only the base coat prescribed by the paint supplier for use with that particular candy colour. Doing this allows you to match the colour later, should you need to, without having to tint the base coat for a match.
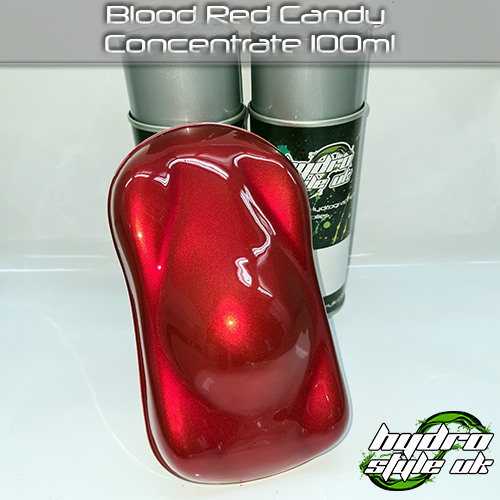
Applying the Candy Coat
*if using our concentrate then this should be mixed at a ratio of 20:1 with the 20 being your binder or clear. So for example at 100ml binder you would add 5ml concentrate.
*If using our aerosol candy please shake for 2 minutes prior to use
Apply two coats of candy base to the item to ensure proper coverage as well as to avoid having stripes in the paint. Allow the base coat to dry slightly and then use a tack rag such as starchem tack cloths on the surface to remove any dust that has settled on the paint.
It is best to spray the candy mid-coat in a sealed spray booth, if possible. If this is not feasible then you should take pains to keep the candy mid-coat clear of dust or particles that may become trapped between the clear top coat and your candy coat. Allow the mid-coat to dry before applying the clear top coat.
Applying the Clear Top Coat
Be sure to use a high quality clear coat like max meyer when applying candy paints. Mix your clear coat following the ratio on the tin unless using aerosols. Spray the clear top coat onto the item after using a tack rag to gently sweep away any dust or other contaminants from the paint surface. Apply three moderately heavy coats of clear top coat to the item to seal in the candy mid-coat. This allows you enough room to sand and buff the surface without danger of breaking through the clear and damaging the candy coat.
Final Sanding and Buffing
Sand the clear top coat after it has fully dried using (at lowest) 1000-grit wet/dry sandpaper with water and then with 1500 or 2000 grit wet and dry sandpaper with water. Keep a dry rag handy to dry off the surface of the clear coat for inspection. After sanding, apply Farecla G3 buffing compound to an orbital buffer and buff away the sand scratches until the candy paint job no longer appears hazy. Finally finish with Farecla G10 polishing compound.